How to Use Twitch Studio An Ultimate Guide
The streaming industry is growing fast and with it comes new third-party software meant to support streaming. Previously, streamers could only use third-party software to customize their streaming on Twitch. However, in the recent past, Twitch has developed the Twitch studio that makes it easy to customize your streaming. In this article, we will guide you on how to use Twitch Studio.
What is Twitch Studio?
Twitch Studio is a free recording and streaming software developed to help streamers broadcast directly on Twitch without needing third-party tools. The program has all the additional features in third-party software such as OBS Studio and Streamlabs. It is created to make it easy for every streamer to begin streaming and customizing their settings.
Twitch Studio also enabled a direct connection between Twitch TV and the proprietary broadcasting software. Users can log into their Twitch studio using their account. On the dashboard, they can also access the category and titles. This tool also has a broadcasting service that enables chat participation.
Why Use Twitch Studio?
Here are some great reasons why you should use Twitch Studio:
Easy-to-use Interface
One of the main reasons why Twitch Studio has become very popular is its easy-to-use interface and easy handling. Even with limited streaming knowledge, Twitch studio makes it easy to start streaming. This can help you gain followers on Twitch.
Better Integration
Since Twitch Studio is a Twitch product, it comes with all the features you need on Twitch, such as chat, alerts, and activity feed. You can easily build a community when you have all the features you need in one place.
Stream Personalization
With Twitch Studio, you can easily personalize your stream to add to the visual appeal. Some of the starter features it comes with are layouts and overlays.
Setup Guide
Twitch Studio has an optimized step-by-step set up guide that lets you set up and adjust the bitrate to get it running in optimum condition. Twitch Studio removes all the complicated settings and it easily integrates with a microphone, monitor, webcam, capture cards, and green screens. The capture cards will help you stream through the console.
How to Install Twitch Studio
Twitch installation and set up are pretty easy. Here are the steps you need to follow:
Download the Program
Start by visiting the Twitch Studio website and download the right document for your gadget. For instance, you should download the Exe file if you have Windows. The .DMG file will, on the other hand, work for Mac. After that, you should follow the same installation process for most programs you may have installed on your PC.
It's also worth noting that Twitch Studio is available for different gadgets running on Windows 10 and higher. Some of the minimum requirements needed to run Twitch software are:
- Windows 7,64 bit/Mac 10:14 Mojave
- A 4 GB RAM, with at least 2 GB of it unused
- 4 Core processor
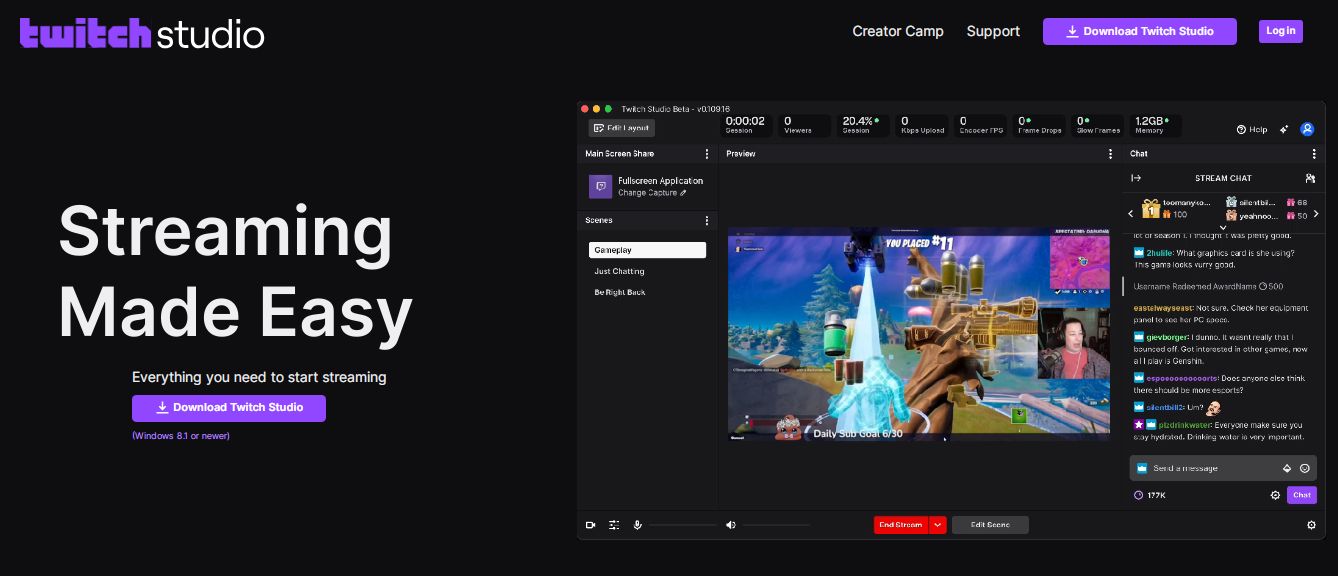
Using Twitch Studio
After downloading Twitch Studio software, you can access it on your desktop or the start menu. You will, however, need to ensure that you are logged into your Twitch account. You should then link your setup to the Twitch studio. You can adjust the interface after ensuring the webcam, mic, and co., are up and running.
Scene
This refers to the scenes you will be streaming. Anything visible on the scene can be seen on the live stream. Twitch Studio allows YouTube to set the scenes for gameplays, breaks, chatting, stream endings, and more.
How to Set up Twitch Studio
After starting a Twitch channel and downloading the program, the next step is to set it up. When you begin using the Twitch studio program, you will see a setup screen. We recommend that you let the program optimize itself.
Before setting the stream's quality, it will examine your hardware and internet connection. Under Stream Quality, you can re-optimize the settings. Alternatively, you can manually adjust the stream quality setting. You may want to consider different stream options such as:
- Preset: This provides options for the frame rate and resolution.
- Frame rate. You can follow the already preset settings.
- Resolution. While it can be adjusted manually, this also follows the preset setting.
- Stream bitrate. A higher bitrate requires a faster internet speed.
Basic Twitch Studio Settings
As we mentioned earlier, the first step when doing the Twitch studio setting is to confirm that the microphone is working well. Immediately, the device is connected to the PC; this will be done automatically, apart from the green screen.
Before making any adjustments, you should begin by creating the individual layout of the stream. These will be the scenes in your stream later enabling you to switch between them. Ensure you give them a comprehensive name such as Start, End, GamePlay, etc.
Microphone Settings
To see if your microphone is set well, click on the setting feature at the lower right corner of the Twitch studio and then on Audio. You can adjust the microphone sound if your room or microphone enables you to do that. Keep testing the microphone until you have the desired setting. Unlike in OBS Studio, the microphone setting on Twitch Studio is very easy to use.
Webcam
A webcam can be added to the stream layout. To do that, you should choose the webcam on which the stream layout should be visible. After that, right-click on edit and create a new layer with the + sign. You can then use the window in the area where you need the facecam in your steam.
Green Screen
You should click on the webcam later if you will use the green screen. After that, you should activate the chroma key on the right menu. This layer has a typical green color, just like its name. These basic settings are enough to begin your Twitch stream. However, if you want to add overlays and alerts to individual layouts, follow the steps below.
Adding or changing screens and layout
To add excitement and awe to your streams, you can add overlays. You can do that to an entire theme or a lone element. Twitch Studio comes with overlay templates that can help you get started. However, if you need something unique, you can easily create one. To do that, you must set up your overlays after downloading them from a third-party site. You can do that by:
- Using a separate folder to save your overlay.
- Clicking on the + sign in the Twitch Studio under Stream layout. A new layout will be created that can be renamed by right-clicking. Since different stream content layouts have different layouts, you should do the same.
- On the renamed file, you can click on the stream layout. Then click on Edit. This will take you to a black window. To edit it, click the + sign on the left menu near layers.
- You can choose the right overlay from the folder in the first step. You will see it in the media library. You can click on it and select it.
- You have integrated an overlay into Twitch Studio.
How to add custom alerts
Twitch Studio also makes setting sounds, alerts, and badges easy. Again, you can add alerts from a third-party provider by:
- Opening the preferred alert, such as Host. You can also choose where you want the alert to be located.
- Inserting the alert image file just as you do with the overlay.
- Saving the file.
Adding a Scene Webcam
Adding a webcam will depend on the scenes, and you need to go to the Scene setting to add the webcam layer. Here are the steps to follow in adding a scene to the Twitch Studio:
- Next to the scene name, click on edit.
- Go to layersetting and click on add layer.
- Select webcam
- Click on Add
- Reposition your webcam
- Click on save
If you struggle to see the webcam, refresh your device or change it altogether. On the right side of the Twitch studio, you can click the Change button and choose your preferred webcam. To close the window, click Done.
Scene Recording on Twitch Studio
With Twitch Studio, you can record a scene even without streaming it. But before you do that, you should check the setting of the Stream Quality, as this is the same setting used by Twitch. Here are the steps to follow when doing that:
- Click on Stream quality under Settings>Preset.
- Ensure that it's set at 1080p60. If this isn't the setting, you should click on the dropdown menu and reset it. This will provide you with the highest frame rate and resolution.
Blur Image Background on Twitch Studio
Most of the Twitch studio layers support the blurring of image backgrounds. Here are the steps you need to follow when doing that:
- Activate the scene containing the image
- Next to the scene name, click on Edit
- Go to layers and then click on image layers
- Under the blur property, you will see a + sign on the right side to click on
- Click on edit blur
- A slider will appear that you should adjust
- Finally, save the image.
Conclusion
Twitch Studio is a great program to enhance your overall Twitch streaming experience. If you are a beginner who is just starting a Twitch channel and wondering how to use it, this guide will help you get started.