How to Use OBS and Xplit to Stream on Twitch
Launched in 2011, Twitch is the most popular video streaming platform. It allows streamers to play video games in a fun and social way. Users of the app and on online TV can broadcast their matches, play their favorite titles, and provide commentary on their games. Today, the platform is visited by millions of users who use it to watch gamers fight with aliens, complete tasks, earn money with Twitch, and do much more.
To begin streaming on Twitch, you only need a computer, a smartphone, a webcam, and a good internet connection. But thanks to its ability to support streaming from different platforms, you can stream on other places, such as gaming PCs. However, to do so, you will need the right software. Two of the most popular software options to help you do that are Open Broadcasting Software and Xplit.
While Xplit is easier to use due to its intuitive user interface, it is paid for. On the other hand, OBS is free and is available for Windows, Linux, and Mac users. If you are wondering how to use OBS to switch on Twitch, this guide will help you understand that.
Why Stream Twitch Using OBS Studio?
You have probably seen a Twitch stream with colorful visuals or regular alerts, indicating that it was being streamlined through OBS Studio. With OBs Studio allowing users to live stream and record videos, it is the perfect partner on Twitch.
While it's not very hard to broadcast your gameplay on Twitch, it can take time and effort to get your steam running. Using an OBS studio can simplify the process and improve your overall experience.
OBS Features to Enhance Your Streaming Experience
With its wide range of features unavailable on the basic Twitch app, such as the Xbox1 and the PlayStation 4, OBS can enhance a user's experience. Some of its key features include:
- Support alerts
- Ability to create "Starting Soon"
- Addition of intermission bumpers
The Source dock box at the bottom of the screen can also be used to change the layer order. You can click and drag the source up a list to move it up a layer. To hide it below other sources, you can drag it down. Choose the eye icon next to its name to make it completely invisible.

How to Download OBS Studio for Windows 10
Downloading OBS Studio to your PC is very easy. However, before you start, remember that the latest OBS studio version only works with Windows 10 and requires a 64-bit processor. Here are the steps involved in downloading OBS Studio:
- Visit the OBS Studio free download.
- To download the right version for your site, click on the Windows Icon.
- To begin the set up, click next on the installer icon
- You will receive the OBS license terms of agreement and license information. To accept the terms and continue installing, click on Next.
- Select the directory you want to save your OBS studio.
- After the installation is complete, you can begin your screen recording.
The process remains the same as other gadgets like Linux and Mac. You will only need to choose the correct gadget in the second step.
How to Set Up OBS Studio and Connect a Twitch Account
If you want to broadcast to the Twitch network with your username, you should link your OBS account to your Twitch. You can follow these steps when doing so:
- Visit the Twitch official site. You will see a drop-down menu located on the top right. Choose ‘dashboard’.
- Choose Stream Key.
- Choose the Show Key button located on the left.
- A warning message will appear on the screen. You will need to confirm it before copying your stream key. The stream key is a long string of random numbers and letters.
- Under the settings menu located on the left side, choose Streaming.
- A pulldown menu will appear. Choose Twitch.
- You will need to pick a server. A good idea will be to choose a location geographically close to where you are. This is important as selecting a server close to you can improve the quality of your stream.
- You should now paste the Twitch stream key to the Stream Key field. You can do that by pressing your keyboard's Ctrl and V keys. Alternatively, you can right-click your mouse and choose paste.
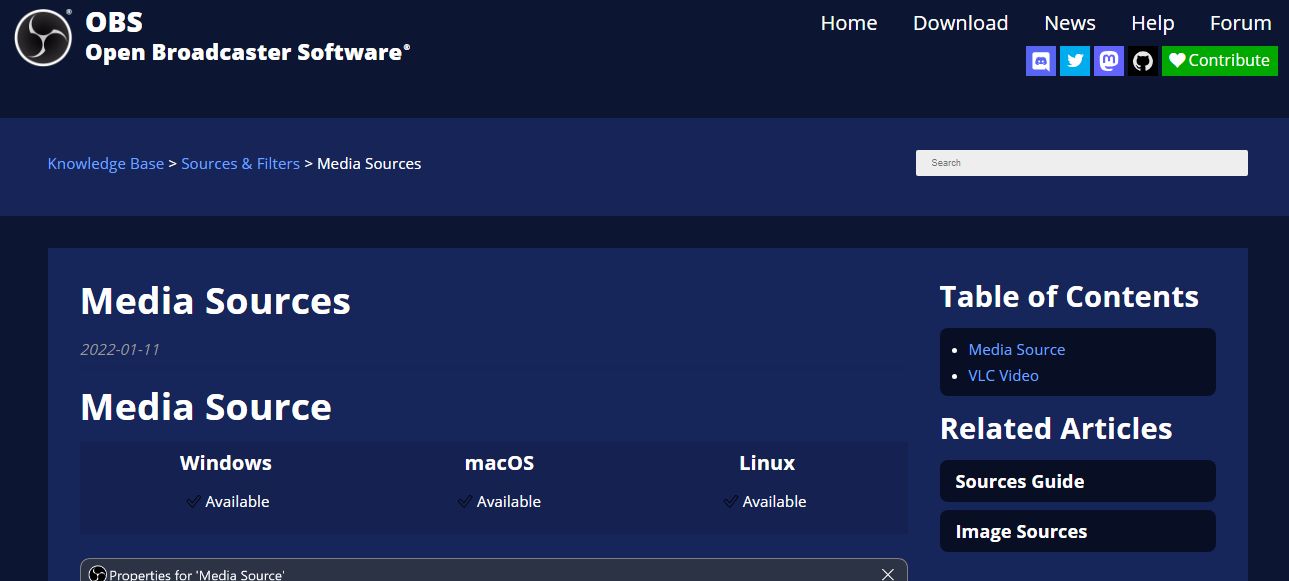
What are the OBS Studio's Media Sources?
Most of the details you see on OBS Studio workspaces are what viewers see when you start streaming. When starting a new profile, this should be completely black. For a more engaging stream, you can add content from various sources. For instance, you can:
- Add your video game console to your content, streaming from Nintendo Switch or Xbox 1. You can read our guide on successful streaming on Xbox.
- Image files: For adding visuals
- A game or an open program
- Webcam
- Video Camera
- PS5 for Twitch streaming
Every source should be added to the layout of your OBS studio as an individual layer. This ensures that you can add media sources above and below others to make certain content visible or to hide it. For instance, if you want to show a webcam to your viewers, you can add it above a background image.
To add a media source to a scene:
- Go to the button of the source dock and click on the + sign
- Choose a media source from the source menu
- Provide a name for the source
- You can click ‘browse’ to select the media source to add to a scene. Choose the recording created earlier in screen capture and recording
- Select loop and reduce the video's speed
A Guide on Creating a Basic Twitch Layout on OBS Studio
You can add various media types and plugins to the Twitch layout. Some of the most popular ones that you can add to the layout are:
Background Graphic or Image
- Click on Settings in the OBS studio and then Video. Choose a resolution of 1920X1080 for both the image and the background. Select Okay. Your workspace will be resized to the right aspect ratio to enable broadcasting.
- Choose your black workspace. Click on Add and then Image. You can add other images to your layout, even in different sizes.
- Give an interesting name to your image layer. This could be something like Background. You can then click okay.
- You will now have your background image on OBS studio. If the image isn't the right size of 1920X1080 in Pixel, use your mouse to resize it.
- Keep watching the Source Box located at the bottom of the screen. The background image layer should also be at the list's bottom. This is important because it's big enough to cover all other media below it.
Alerts and Notifications
Alerts refer to special notifications that appear during your Twitch streaming. Since these are added by third-party services like StreamLabs, they should also be added to a website address or URL. Here are the steps to follow when adding Twitch alerts and notifications.
- Log in to the account on the StreamLab website.
- On the left side, you will see an expandable widget menu. Click on it and then choose Alertbox.
- Click on the box saying select to show website URL. You will see a URL address that you should copy to your clipboard.
- Right-click the layout on the OBS studio and then add. You can then choose BrowserSource.
- Give a unique name to your alerts, such as Alerts. You can then click on Okay.
- You will see a new box pop up. In the default address, change the default address using the one you copied from Streamlab. Choose Okay.
- Ensure the layer is at the top of your list in the Sourcebox. This will ensure that your alerts only appear over other media sources.
Remember to customize your altars in StreamLab if you haven't already done so. Once you have made the necessary customizations, you don't need to customize anything else on OBS Studio.
How to Use Xsplit
To configure your stream, you should follow these steps:
- Open Xsplit
- Select Broadcast before adding a channel, and then Twitch
- Choose Authorize and add your Twitch username and password
- Select Finish. The Xplit software will choose the ideal resolution
- You can edit your stream properties before clicking OK
How to Set Scenes and Go Live
- Go to the screen source section. This is located at the bottom left corner of the XSplit interface. You should then click on add. Hover your mouse on Game Capture and click on your preferred game.
- To upload additional sources such as games or webcam sources, choose Add Again.
- Drag each source to match your needs. For instance, you should feature your game capture feed prominently while showing the webcam with a small box at the corner showing your webcam feed.
- You can then click on Broadcast and then Twitch. You will immediately go live.
A Guide on OBS and Xsplit Layouts
After understanding the basics of Xsplits and OBS, you can now begin customizing streams with suitable layouts and custom alerts. Fortunately, many tools can enhance your stream's look and feel, such as StreamLabs and Stream Elements.
Stream Labs provides users with a wide range of customizable widgets, such as Alertbox, that show notifications on your screen for activities such as viewers subscribing to your channel or donating. It can also help you to set up bots to moderate your chat rooms.
With StreamElements, you can design an entire layout or choose from various pre-made layouts with widgets, layouts, and more. After creating a theme, you can easily add it to Xsplit or OBS with a simple browser code.

How to Begin a Twitch Stream on OBS Studio
Now that you have customized your basic setting, you can begin to stream on Twitch using your layout powered by OBS studio. All you need to do is click the ‘start streaming button’ at the OBS studio's bottom right corner. You can then wait to be connected to the Twitch server, and you will go live. You can also read our guide on how to stream mobile games on Twitch.
Final Thoughts
As a prospective streamer, you must understand how to stream on Twitch. With over nine million users, the platform has become extremely popular with many channels. This is because of its many capabilities, including advertising on Twitch. If you are wondering how to use OBS to stream on Twitch, our guide will help you.
.